MIAD Industrial Design Project
|
Imagination
Photoshop Mind Map foam core 20in x 30in December 2019 Exhibition Text This project is influenced to help fellow artists for popular utensils. I picked the three main utensils I think are important, which are ink pens, markers, and Lead pencils. The purpose of this is for artists to have everything they need in one, so they don't have to stress not having a certain utensil or forgetting a utensil. All the tools would be easy to travel with and carry around. |
|
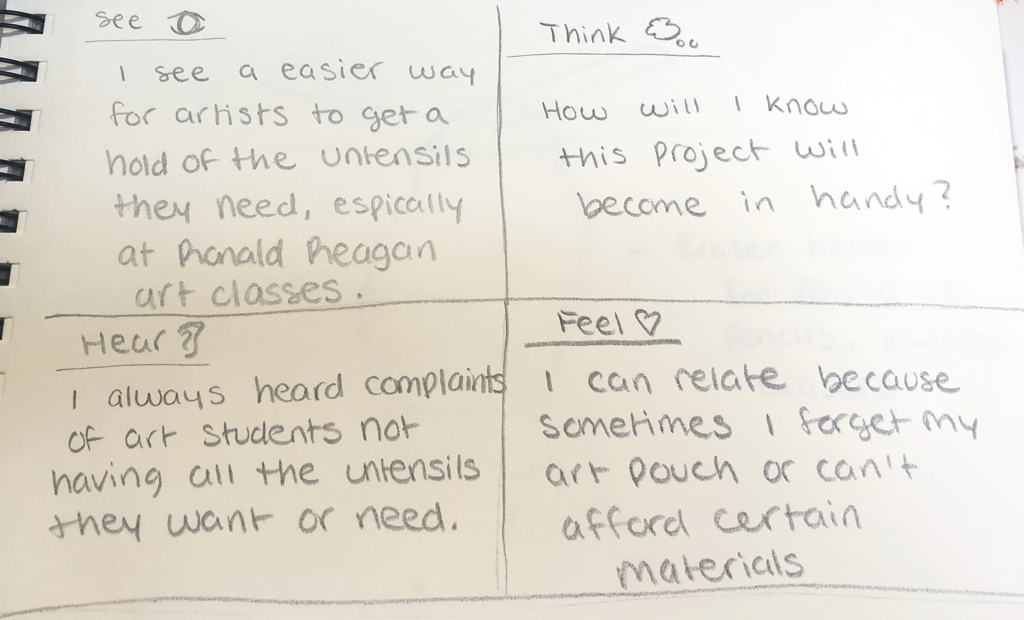
POV Statement
We Met: A former art student at Ronald Reagan named Henry Bub. We were amazed to learn: That having all important writing or inking tools together, can actually be a thing. It was amazing to think we could create one for all artists in the world. It would be so simple to switch to what is needed. It would include a wooden and mechanical pencil, Thick and fine point marker, and A thick and fine point ink pen. In the middle will be endless erasers. It would make a real difference if we could: It would make a difference if I created this utensil for artists because when they're working on a project they don't have to worry if they remembered a certain tool or they don't have to keep switching. They can just rotate or switch. It'll become really handy and It would have a carrier to be put in so it's easy to travel around with it. |
|
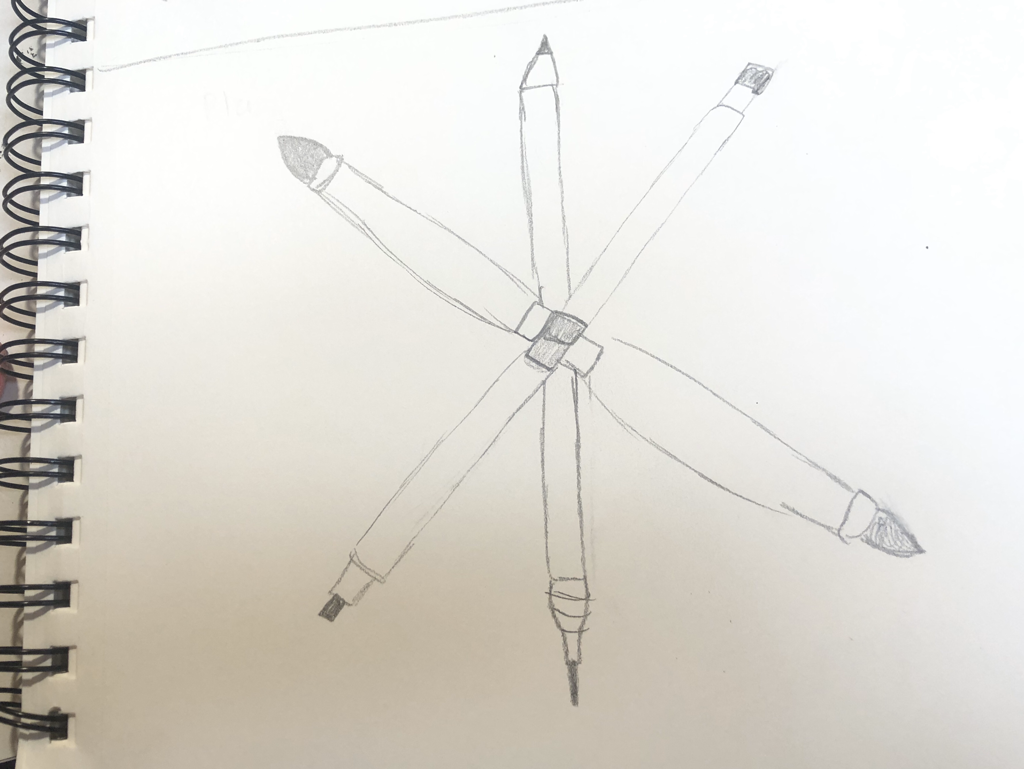
First Planning Sketch Of Product

|
The whole design of it, I want it to just be a wheel so it's easily to travel with and switch which one you want to use. I want it to not be complicated for Henry and other artists. It's going to have all the common untensils artists will need. For the case for this wheel will be something that can't destroy the product. Then below it in the middle will be a pouch or container full of erasers, I still haven't figured out how I want to design the eraser holder. But I want it to be easy to use and easy to get the erasers. It will hold erasers for the wooden and mechanical pencils. |
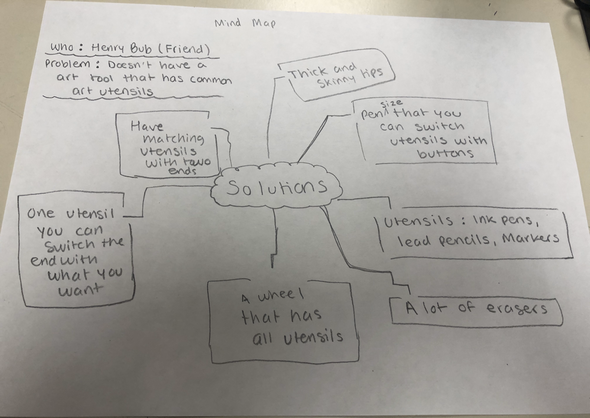
Mind Map
Individual Pictures of Designs from Mind Map
|
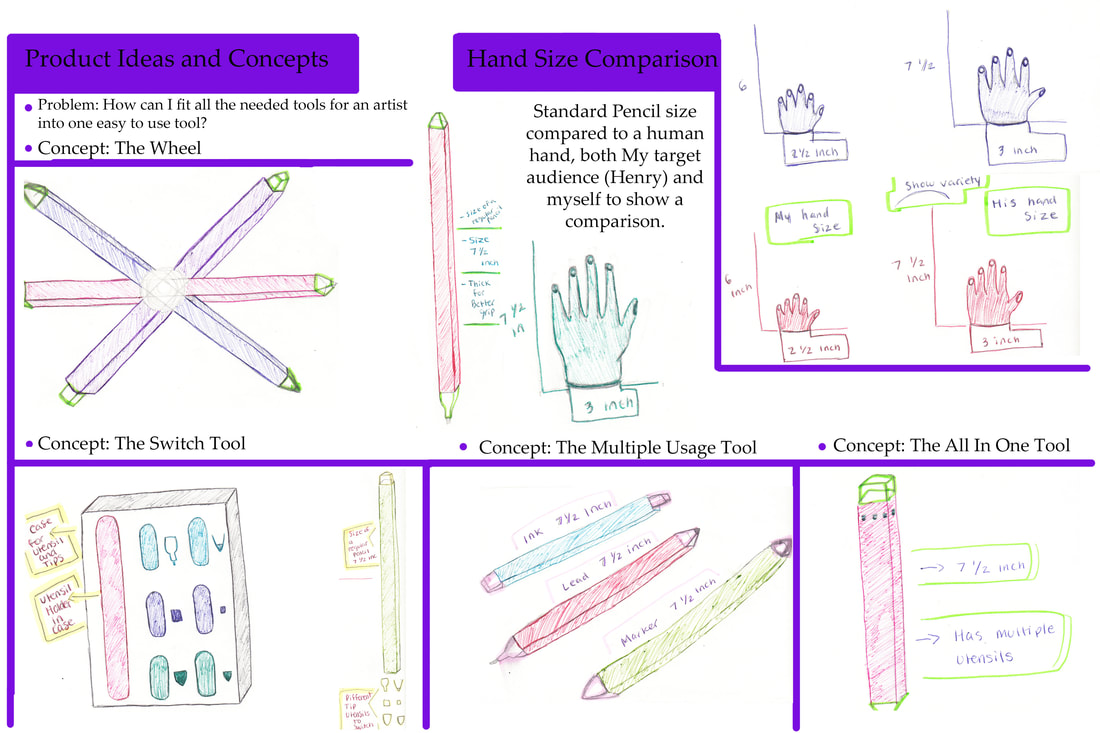
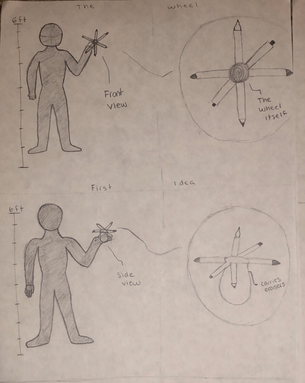
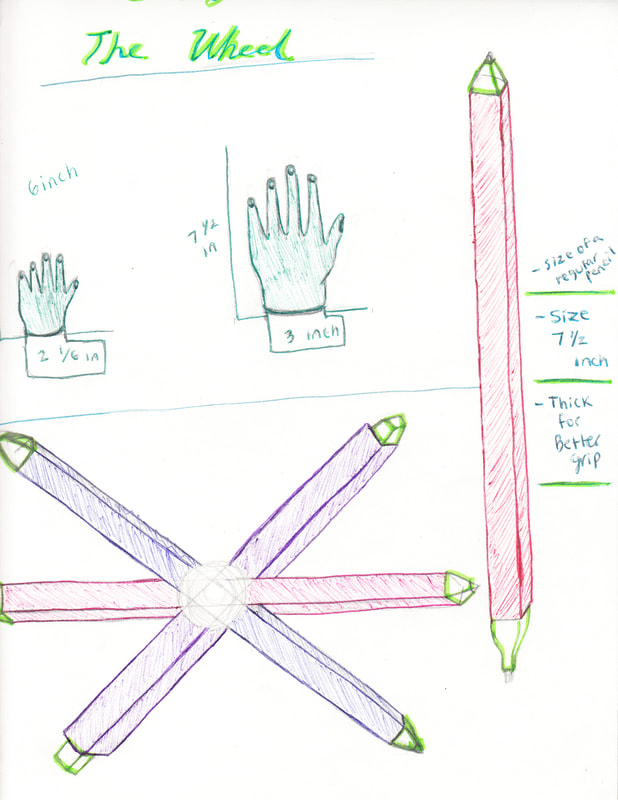
This is my first finalized planning sketch this was continuing from my planning sketch the wheel. I added more visuals and got more in depth. I wanted to add a human like figure to show the size comparison. Then I also wanted to show the product zoomed in as well. I wanted them to be zoomed in from different angles, so I added the top view and the side view. I also added the different views close up and from the figure holding it.
|
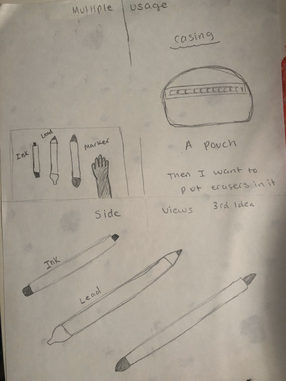
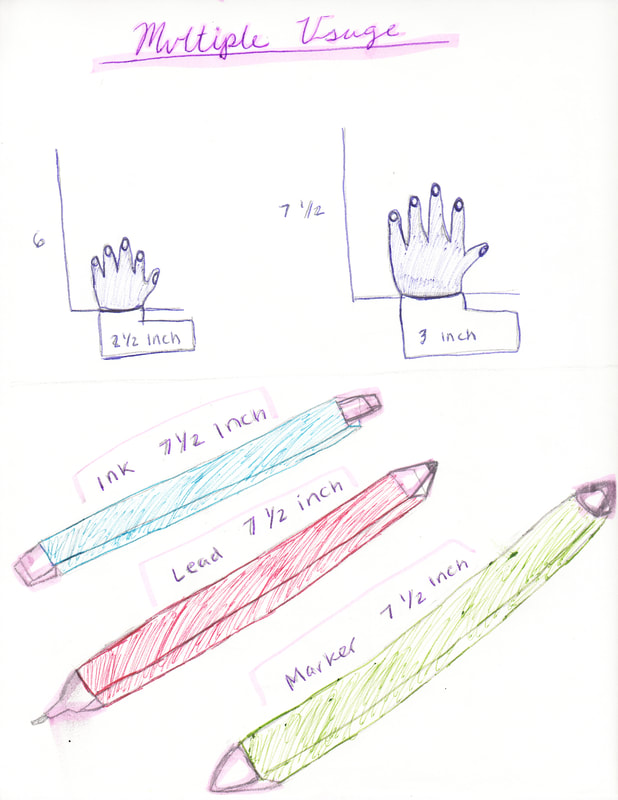
Then this is my second finalized planning sketch. This design is called multiple usage. I named it that to show you can use any utensil and have a variety. For this sketch I showed the utensils on the desk with a hand and arm figure to show size comparison. Then on the side, I wanted to get more creative and show a casing for the tools. Both the casing and tools would be able to fit in a pocket. Then on the bottom I just showed the different utensils up close.
|
|
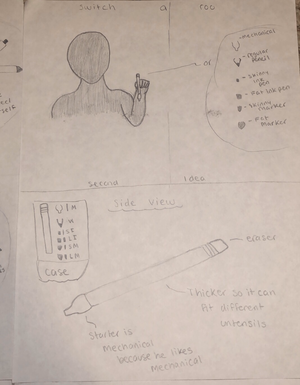
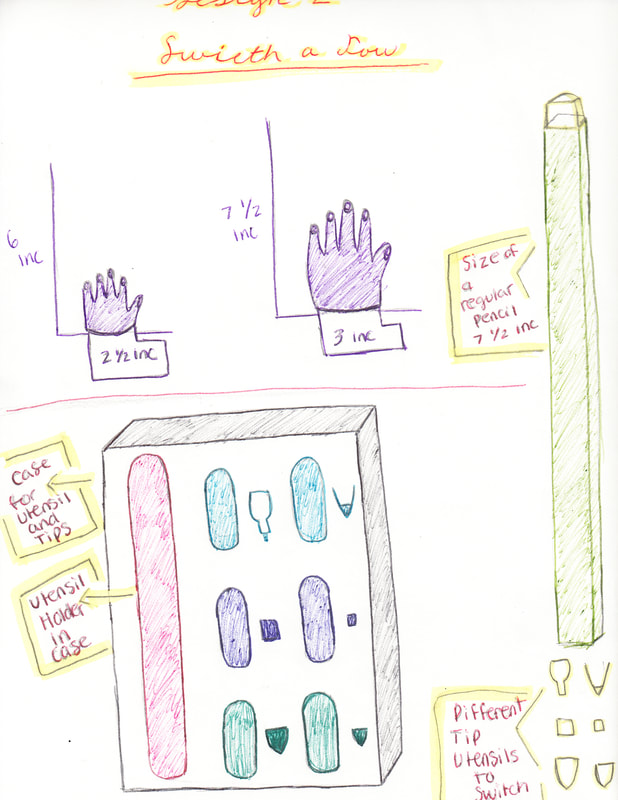
Then this is my third finalized planning sketch. This design is called the switch a roo. For this utensil instead of changing the body. The tips change to whatever utensil you want to use. I showed the size of the utensil in a hand of a figure to show the size comparison. Then on the side I zoomed in to show the different tips and sizes of them.
|
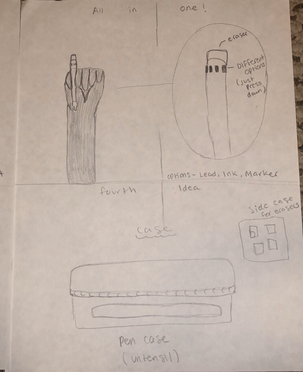
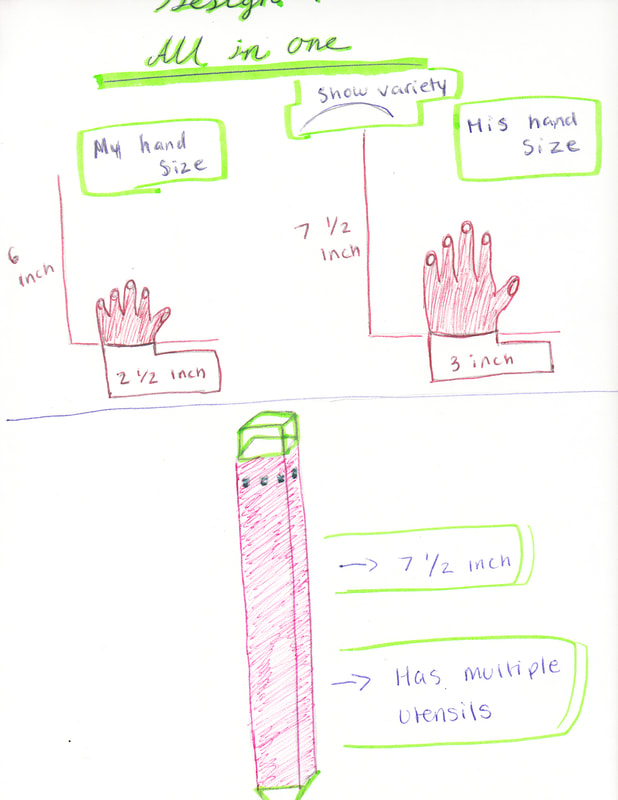
This is my last finalized sketch. This one is called all in one. To represent the items are all in one utensil. Such as ink, marker and lead/pencil. For size comparison I showed/drew the utensil in the hand. To represent that it's regular size, but not too big. Then on the side I showed how to use the utensil, such as pushing down the buttons to get the tip you want. Then on the bottom I showed a case for it, that can also fit in pants pocket.
|
Process
|
Experimentation
The only things I experimented with throughout the final designs, was the casing and hand sizes that can hold the utensils. I also experimented with colors, I know Murf our mentor wanted lots of color. So I wanted to figure out what utensils I can use that are bold, but simple and professional. I decided to use my colored pens and highlighters. The highlighters were used to bold the main utensil products that we huge for representation. Then for hand sizes, I measured my client's hand and measured mine. I did this to show variety because he has bigger hands than mine. My hands are really tiny, so I wanted to show that people with tiny hands can use the utensils and not be uncomfortable using it. |
|
Process
First thing I had to do for this project was a lot of brainstorming through sketches of the products. I set my mind to four designs, But still have to figure out which one I want to go with. When I finished creating the designs, I started my mindmap to help me think about the specific things I needed to accomplish in order to succeed in producing the utensils. Once I was done with creating the mindmap, I had more creative ideas and approaches I thought of to make the tool. For the final product I compiled my sketches into one board on photoshop, using the schools laptops. This took a while because I couldn't access the document at home, So everything had to be done at school. When I completed the board design on photoshop, I uploaded it to my usb, so I can insert it into the printer to get my final product. When I contained the final printed paper of the board size, I grabbed a black board that was the same size of the paper and sprayed it down with glue. Then I prepped the poster to be pasted onto the black board. Once I was finished with that process, I trimmed the excess paper away.
First thing I had to do for this project was a lot of brainstorming through sketches of the products. I set my mind to four designs, But still have to figure out which one I want to go with. When I finished creating the designs, I started my mindmap to help me think about the specific things I needed to accomplish in order to succeed in producing the utensils. Once I was done with creating the mindmap, I had more creative ideas and approaches I thought of to make the tool. For the final product I compiled my sketches into one board on photoshop, using the schools laptops. This took a while because I couldn't access the document at home, So everything had to be done at school. When I completed the board design on photoshop, I uploaded it to my usb, so I can insert it into the printer to get my final product. When I contained the final printed paper of the board size, I grabbed a black board that was the same size of the paper and sprayed it down with glue. Then I prepped the poster to be pasted onto the black board. Once I was finished with that process, I trimmed the excess paper away.
Reflection
Overall for this project, I don’t think it was the best. I feel like if I had better photoshop skills and more constructive drawings, the board would be more professional. The project was pretty easy to do, and photoshop is an easy app to use. But again if I was more skilled in photoshop and industrial design the board would be better. I really love my planning and ideas for this project. It really let me be creative, so I planned designs that were creative and not normal like. So I really liked that my ideas didn’t have rules within this project. Overall I feel the product came out good for the skill level I’m at.
ACT Responses
1) Clearly explain how you are able to identify the cause-effect relationships between your inspiration and its effect upon your artwork:
Murf inspired me for this project, through mini exercises he made us do. He also inspired me to use my imagination and creative ideas.
2) What is the overall approach (pov) the author (from research) has regarding the topic of your inspiration?
The overall approach was to create an object that will make people’s lives easier. Which inspired me to make some easy to use for artists, since I’m an artist
3) What kind of generalizations and conclusions have you discovered about people, ideas, cultures, etc. while you researched your inspiration?
I learned that creativity and imagination can actually create something to help people and society.
4) What was the central idea or theme around your inspirational research?
The central idea or theme for inspirational research, was to create a art tool that holds all the important art utensils. Such as ink pens, markers, and lead pencils.
5) What kind of inferences did you make while reading your research?
The inferences I made was that each utensil has different sizes with tip and the body. So I had to make sure the tool would be comfortable for people with different size hands
Bibliography
Jasmine, et al. “8 Best Drawing Pens for Artists: A Close-Up on Animation.” Animataurus, 15 Sept. 2017, animataurus.com/drawing-pens/.
Shovava. “8 Best Art Marker Sets for Coloring Enthusiasts and Professional Creatives.” My Modern Met, 16 Mar. 2018, mymodernmet.com/best-artist-markers/.
Shovava. “8 Best Art Marker Sets for Coloring Enthusiasts and Professional Creatives.” My Modern Met, 16 Mar. 2018, mymodernmet.com/best-artist-markers/.
